Tuesday, November 30, 2010

Vintage Christmas

I made a total of 28 cards like the ones I shared yesterday (Gingerbread Christmas card).  I actually started them sometimes back in the summer and got a pretty good start towards the 80 -90 cards I'll need this year.  Now I'll share a little secret about me --- I get bored easily --- especially doing the same thing over and over and over again! So....you might figure that 28 of the same style of card is about all I can handle, and it's time to switch to something different!
I made up a few vintage Christmas cards last year and really liked how they turned out.  I decided to try some again this year.  The two on this page use images from Clearly Vintage (I think Cora posted them last Christmas season if you care to look for them). She's started posting some for this year, and I can hardly wait to use the adorable little girl holding the doll in this post!
Supplies used on the above card:
  • Image from Clearly Vintage
  • Cream cardstock 
    • printed image on and matted on a torn piece to enhance the vintage look
  • Blue ink
    • inked edges of torn paper with
  • Script Embossing folder (Provo Craft)
  • White ink
    • inked over embossing with
  • Snowflake Die (Sizzix)
  • Snowflake Brads
 Supplies used on this card include:
  • Image from Clearly Vintage
  • Cream Cardstock
    • printed image on
  • Red Cardstock
    • matted image on and tore edges to look "old"
  • Brown ink
    • inked torn edges with
  •  Script embossing folder (Provo Craft)
  • Black ink
    • inked over embossing with
  • Martha Stewart Branch Punch
  • Little red "berries"
I made two each of these designs -- see I told you I had a short attention span..........come back tomorrow and the rest of this week to see some more Christmas cards  I'm working on!

Monday, November 29, 2010

Christmas Cards

I've had my Christmas cards started for a long time, but decided to wait till it was actually close to the Christmas season to share them. They won't all be the same this year, and I'm not entirely certain that they'll all be homemade --- I'm working on it, but there are so many other things (more important) to do that I haven't had a lot of extra time to spend in the craft room.
The above card was "born" when my mom sent me a little gingerbread pattern she'd clipped from a magazine.  I messed with it some and came up with the cute little gingerbread boy above.
Supplies used:
  • Gingerbread boy pattern
  • Linen background stamp (Creative Stamping --Backgrounds and Beyond)
  • Red ink (stamped linen stamp on gingerbread boy)
  • Star Punch (buttons)
  • Scallop Scissors ("icing" on legs/arms)
  • White paint marker (mouth)
  • Heart punch (cheeks)
  • Black Glitter paint (eyes)
  • Ribbon (bow-tie)
  • Small tag
  • Hot cocoa stamp (Studio G)
  • Candy cane (I got a big pack of them at Michaels last year in their after-Christmas clearance)
  • Red fiber
  • Sewing machine (stitching around the edge)
Here's two more cards using different background paper, but with the same design...
 I ran out of tags before I ran out of gingerbread men so I improvised by centering the gingerbread man and giving him two candy canes to hold....

Saturday, November 20, 2010

Welcome Gift

I LOVE to give gifts.  In fact I can't think of anything I enjoy more than giving -- whether it be time, money, or "gifts" I love to give.  My husband doesn't quite understand this part of me, and has frequently tried to stop me from giving things away he thinks I need to keep!
Now to be fair, I can't brag on that love at all....it's not something I need admired for--- because I simply can't help it......I inherited it from my mother.  She may be "worse" than I am about it (if that is something you can be "worse" at!). If someone gives her $10 to spend on herself, likely as not she will buy something for someone else with it! 
So, maybe that explains all the "gift" posts lately --- and here's another one!
We are entertaining guest speakers this week, something else I enjoy doing (as long as I feel well).  The above gift is the "Sunshine Basket" I made up for them. 

Included in the basket (that I purchased on clearance at Wal-mart) is:
  1. A fall notepad
  2. A book (we had actually purchased it for someone else as a Christmas gift, but they already had it!)
  3. Two bags of Kettle Corn Popcorn
  4. A fall dish towel
  5. A fall candle
  6.  A bag of Indian Cornmeal (something native to where we live)
  7. Three recipes for the cornmeal
  8. A pair of aloe infused socks 
  9. Tic Tacs
  10. Pack of gum
  11. Sample size lotion
  12. Sample size hand sanitizer
  13. Welcome card
 All told it cost me less than $20 to make this basket up (if you consider that I already had the book), and it really made their day to get it which was a gift in return to me! I love making people smile and feel special!

Wednesday, November 17, 2010

Bucket Handbag - Tag Details

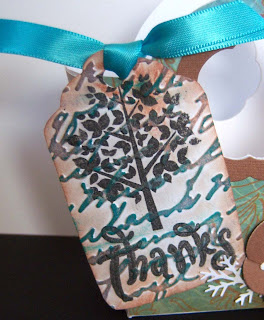
 Today's post is about the tags I attached to the bucket handbags I made as gifts last week.
To start with I hand cut the tags out of white cardstock.
Then I stamped the tree (Out on a Limb - Creative Stamping stamp) and the "thanks" sentiment (Nature's Beauty - Creative Stamping stamp) in black ink.
Then I embossed the tag using the Script embossing folder (Provo Craft) and inked over it (and around the edges) with coordinating (to the bag's colors) inks.
All the tags have at least two layers of ink on them -- a coordinating color and brown.
Some have three ---like this tag....I inked it in light blue, then brown, and lastly added some teal to it.

The last step was to punch a whole at the top and tie a matching ribbon.

Tuesday, November 16, 2010

Bucket Handbag Gift - Post it note holder

 Today's post is about the post it note holder in my little bucket handbag.

Here are the dimensions for the ones I made:
3 1/2 inches wide
8 1/8 inches long
Turn sideways and score and fold @ 3 1/4 - 3 1/2 - 6 3/4 - 7

I ran out of post it note and had to buy a few more.  The second set had 100 sheets on them and were thicker. I had to tweak my measurements a bit on them:
3 1/2 in. wide
9 1/8 in. long
Score and fold @ 3 1/2 - 4 - 7 1/2 - 8


You'll notice I used my versa mark and stamped a swirl design on the bottom front panel.
 The strip of patterned paper on the front of the post it note holder  is 3 1/2 in. x 1 in. and matches the paper used on the front of the bucket handbag.
 I attached Velcro dots to keep the flap closed.

Here's a view of one opened up....I wrote my thank you message on the top sheet (not pictured).

Just for fun I'm linking to three other post it note tutorials.....

  1. This one includes a small pencil with it!
  2. This one uses the rectangle shaped post it notes
  3. This one used an acrylic photo frame as a base and turns it into a desk accessory

Monday, November 15, 2010

Bucket Handbag Gift - Peppermint Patties

Peppermint Patties
3/4 cup sweetened condensed milk
1 -1/2 teaspoons peppermint extract
4 to 4-1/2 cups confectioners' sugar
3 cups semisweet chocolate chips
2 teaspoons shortening
In a bowl, combine milk and extract. Stir in 3-1/2 to 4 cups confectioners' sugar to form a stiff dough. Turn onto a surface sprinkled lightly with confectioners' sugar. Knead in enough remaining sugar to form a dough that is very stiff and no longer sticky.  Shape into 1-in balls. Place on a waxed paper lined cookie sheet. Flatten into 1-1/2 in. circles. Let dry 1 hour. Turn and let dry 1 hour longer. Melt chocolate chips and shortening; cool slightly. Dip patties in chocolate mixture and place on waxed paper to harden
Yield: 3 dozen
For something different - I decided to make my patties in heart shapes.  Instead of forming balls, I patted out a portion of the "dough" and cut it with a small heart shaped cookie cutter.
Note: If you choose to cut them in a shape, it's helpful to refrigerate them before dipping them....to keep them from melting and loosing their shape.
I also drizzled mine with White Almond bark to "make them fancy."

Saturday, November 13, 2010

Bucket Handbag Gift

Here's a gift I made up for some church ladies who help to lift the burden of entertaining guest speakers by bringing in suppers during weeknights. Other times I have given a pretty dish towel and candy bar tied up with a thank you note.....this time I decided to make the entire gift.  First I made the little bucket handbags, attached a thanks gift tag, put a bag of homemade peppermint patties and a covered post it note holder inside.
I'm not sure that it turned out to be cheaper, and I know it WASN'T less work -- BUT it sure was a lot more FUN!   I ended up making 10 of them over the course of three days.


Today I'll share the links for the Handbag --- details on the peppermint patties recipe, post it note cover, tag --to come later.

Here's a link to the Handbag template and another link to a whole list (55 +) bag templates (on Mel's blog).
Here's another link to a whole gallery (on Splitcoast Stampers) of ideas on how to decorate your bucket handbag.
 Supplies I used on the handbag (besides the template):
  • White cardstock 
    • all the buckets have this for a base
  • Misc. Scraps of paper from my paper scrap bin
    • Makes me glad I hoard my paper like I do and save every scrap.  Almost all of these were made completely out of my paper scrap bins. 
  • Blossom Nestabilities 
    • I cut both the hole for the bag handles and a solid piece of cardstock (in matching paper) with this. I used the middle piece from the solid piece of cardstock to create the flower on the right
  • Flower Die
    • middle white flower
  • Rhinestones 
    • centers of flowers
  • Martha Stewart Branch punch
I'll share the recipe for the homemade peppermint patties on Monday ---

Wednesday, November 10, 2010

I Challenge You Wednesday - Lattice Front

My friend picked the challenge this week --- it was to do a lattice front on your card like Valita did (click here).
I'm on dial-up so viewing the video was not an option for me, but I managed to figure out a way to do it (probably not Valita's way, but what I did worked). I didn't have a lot of extra time so I only managed to try this technique once.  The "bright idea" of turning a scallop circle into a pie card was mentioned, but I didn't get that done (maybe my friend did?).
Anyway, here's my challenge card for this week:
Supplies used:
  • DP - Classics (K & Company)
  • Leaves dies (Provo Craft)
  • Script embossing folder (embossed leaves)
  • Brown ink (Inked over embossing and over lattice)
  • Fall Ribbon (ribbon rose)
  • Ornate Labels # 4 (Sizzix)
  • Autumn Spendor Thankful stamp (Making Memories)
  • Copper ribbon (small bow on stamped image)
Here's the inside of my card ---you can see how I covered up the lattice work....
Used Harvest Expressions (Inkadinkado) and Copper embossing powder for sentiment inside.
Now click here to see what my friend came up with for this challenge.

Monday, November 8, 2010

Get Well Soon Gift

A friend of ours is in the hospital with pneumonia, here's a little gift I fixed to cheer her up!
Not only is she allergic to flowers (making it excusable to not take the traditional "in the hospital" gift), but I kind of thought she would like to have something to read, something to keep her toes warm, and a little something sweet (to share with her husband when he's there during the day!).
I was right in my assumption -- she was "tickled pink" (smile) when I delivered it tonight!
Here's whats included in the little package:
1 Country Woman Magazine
1 two pack fuzzy socks
1 roll (12) Amish Sugar Cookies (click here for recipe and neat gift post)
1 note card with a special get well message inside
LOTS of pink curly ribbon!
I used my scallop scissors on the edge of the wax paper to "dress it up" a little - close up pic:
And now the little notecard details
I decided to make this little card in a different shape than the usual square.
Supplies:
DP - Classics (K & Company)
DP embossed w/Swiss Dots embossing folder (Provo Craft)
Poppies Die (Provo Craft)
Poppies embossed w/Script Embossing folder (Provo Craft)
All embossing inked with brown ink pad
Sentiment - Studio G
Sentiment embossed w/white embossing powder
Hole punch 
Flower punch (over hole)
Brown/Green/White Cardstock
This post linked to:

Thursday, November 4, 2010

Out of this World Birthday


Here's a card I made in the space theme for a boy. 
Supplies used:
  • Black Cardstock
  • White cardstock (for moon)
  • ???? Embossing Folder (Provo Craft)
  • Outer Space Sizzlits Die (Sizzix)
  • Misc. cardstock scraps
  • Star Brads
  • Blue Foil Star

Wednesday, November 3, 2010

I Challenge You Wednesday - Transparencies

I picked the challenge for this week -- it's a challenge using transparencies --- click here for complete details.
The short version is this:
  1. Stamp your image using StazOn ink onto a transparency
  2. Cut out and run through (ink side down) a sticker maker 
  3. Stick image to desired piece of designer paper (don't use double-sided)
  4. Immerse into cold water for a few seconds
  5. Gently rub off wet paper
  6. Part of the paper image will remain -- you now have a transparent/printed image to use on your card!
Alternate directions say you can use packing tape if you don't have a transparency or lack a sticker maker.
There's a beautiful example of that here!

I had fun with this new-to-me technique and here are the two cards I completed using it:
Card #1
Supplies used:
  • DP - Classics (K & Company)
  • Flower Stamp (Autumn Leaves)
  • Black StazOn ink
  • Background and Beyond Script Stamp (Creative Stamping)
  • Square Punch
  • Cream Lace
  • Burgundy Ribbon
  • Tan Ribbon done up in the "ruffled ribbon" way
  • Script Embossing folder
  • Tan Ink (inked over embossing)
Card #2
Supplies used:
  • Butterfly Fancy (Creative Stamping)
  • Square Punch
  • Background and Beyond Script Stamp (Creative Stamping)
  • DP - Classics (K & Company)
  • Yellow Ribbon
  • Black Felt Tip Pen (Faux Stitching)
Now go here to see what my friend came up using this "new" technique.

Tuesday, November 2, 2010

Another Cat Card

A friend ask me to make her a birthday card for her niece.  I originally wanted to put Yorkies on it (since her niece has two of them and loves them), but after searching the net for just the right photo I discovered my printer was out of colored ink! SO...........I had to settle for a recycled calendar image of a cat! (Thankfully she likes those too ----- and the aunt giving her the card LOVES them, so it should be a hit!).
Supplies used:
  • DP - Classics (K & Company)
  • Image - recycled from a small calendar
  • Poppies die (Provo Craft)
  • Script Embossing folder (on poppies) - Provo Craft
  • Vintage lace (from the thrift store)
  • Pink Button
  • Paw print stamp (on button) - Studio G
  • Copper embossing powder (paw print)
  • Sentiment - Creative Stamping
  • White embossing powder (sentiment)
Since this was a special order card for a "special niece" I decided to do the inside up too.....
Supplies used in here include:
  • Paw Print stamp (Studio G)
  • Brown ink
  • Printed (on my computer) sentiment
  • Threading Water Border punch (Fiskars)
  • Poppies Die (Provo Craft)

Monday, November 1, 2010

Novemer Bulletin Board


Something simple for the bulletin board this month --- a recycled calendar page.
I used a fall image from an old Thomas Kinkade calendar...
- cut it down so it measured 10 1/2 inches wide
- cut this into 3 1/2 inch pieces
- glued it to a piece of orange paper leaving small gaps between the pieces
- attached a thanksgiving verse -- simple and easy!
I wanted to convey a warm feeling of thankfulness for one of life's most precious gifts -- family, friends, and HOME!