Monday, February 28, 2011

Calendar Challenge - February

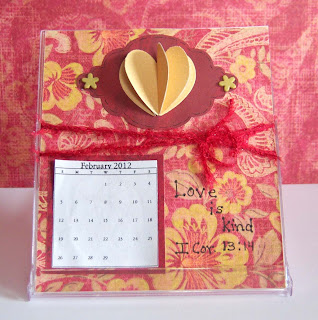
Time for this months calendar challenge. You'll recall (from this post) that I'm making 2 CD case calendars with Scripture on them and 2 quilt block calendars.  The above is my CD case February calendar for next year.
Supplies:
  • DP - Classics (K & Company)
  • Red Cardstock
  • Two flower brads
  • Red Fibers
  • Felt Tip Pen (faux stitching/verse)
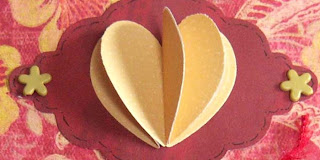
The heart was made by folding four hearts in half and gluing them back to back.
 The Quilt Block Calendar
Supplies used:
  • DP - Classics (K & Company)
  • Punches
    • 1 1/2 in. square punch (corners)
    • 3/4 in. square punch -- all those little squares on the patchwork heart
  • Scalloped heart stencil
  • Red Fiber
  • Bic Metallic Marker - Red Elementz
    • Traced around the heart with
  • Black Felt Tip Pen (faux stitching all over the heart and around the "quilt block")
  • White/Red Cardstock


Now go here to see what my friend made for February's calendar.

Saturday, February 26, 2011

Peanut Butter Pie


Ever eat a peanut butter pie that was so sweet it nearly made you shiver! I have.  I made one several years back that was just TOO SWEET to eat like a pie. (Anyone who knows me knows that it's hard to imagine anything being "too sweet "for me!) We actually cut up apples and used the pie for apple dip instead!
Well - this pie is just the perfect blend of sweetness and includes something else I love --- Chocolate! Another plus is how quick and easy it is to make!

Peanut Butter Pie
2 pkgs. (3oz) cook and serve chocolate pudding
4 cups milk
1/2 c. peanut butter
3/4 cup powdered sugar
1 pie crust - baked
Cool Whip

Cook pudding and milk till thickened
Combine sugar and peanut butter - sprinkle in crust
Pour pudding over and let set till cool (I put a piece of saran wrap over my pudding to keep it from forming a "skin" on the top of the pie till it's cool enough to add the cool whip.)
Top w/ Cool Whip
Yield: 1 large (deep dish) pie or 2 small pies 
Refrigerate
Serve and ENJOY!

Variations:
  1. You can use Vanilla pudding if you're not a chocolate lover.
  2. You can use a graham cracker crust instead of the regular pie crust (tastes just as good and really helps when you're in a hurry)
  3. You can reserve some of the p.butter/sugar mixture and sprinkle on top for a "fancy" look.
This post linked to: Sweets For a Saturday

Friday, February 25, 2011

Shabby Rose

The shabby rose is a super simple (and quick) embellishment to add to  your projects [be it cards, scrapbook pages, gift bags, or whatever else you need a little something pretty for!].
I decided to experiment with this homemade rose and see what "looks" I could come up with. 
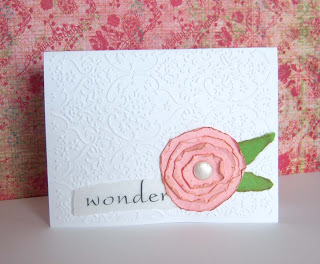
The first one (above) I ran through my Cuttlebug with the Swiss Dots embossing folder, lightly inked the edges with brown ink, and added a homemade "pearl" to the center (see the "homemade dew drops" tutorial link on the side).
Here's a closer view

For the next one I crumpled my paper up before rolling the edges and assembling the rose. I like this one a bit better as the embossing folder tended to "smash" the paper more than I wanted. I also used pattern paper for the leaves for something different.....a closer view of this one:
For these first two I kept things simple --- attached the rose to a white card-front (embossed with the textile embossing folder) and added a velum sentiment. Easy CAS cards....
This one was my favorite --- I used patterned paper, crumpled the layers before assembling, and rolled the edges.  I did the same for the leaves.
Other supplies used:
  • Image from Magic Moonlight Free Images
  • Script Embossing Folder (Provo Craft)
  • Violet and Brown ink pads
    • lightly rubbed over embossing - violet first and then brown
  • Brown cardstock (matted image on)
A closer view of this shabby rose
BTW - I painted all my faux pearls with nail polish! Quick, easy, and dries pretty fast too!

The fun thing about these is how simple they are to make -- just three (or in my case four)  torn circles, a little glue, and something for the center!  Here's a link to a quick tutorial on them.
So go get yourself some cardstock and give them a try --- I'd love to see what you use yours on -- feel free to leave me a comment with a link to your project!
Happy Crafting!
This post linked to:
Whipperberry Friday Flair 
 Humble Homemaking Weekend Review
Made With Love Monday
Take a Look Tuesday
Handmade Tuesdays


Thursday, February 24, 2011

Birds Nest and Stuffed Bird

When I saw the crocheted birds nest (made from strips of material) and the Tuffy Bird Family in the newest issue of Crafts n' Things (a V-day gift from my dh) - I mentally put it on my "things to do list."  My living room is decorated in blues and yellows with birds, bird-houses, flowers etc....so it looks like it was "made with me in mind."  Here's a link to the free pattern for the birds on the Crafts n' Things website.  [If you're planning to make the little baby birds - make sure you're well stocked on patience! :) ]
Here's a closer view of my bird/nest sitting on the shelf.
BTW - That cross stitch  in the top picture is one I did about 8 or more years ago when cross stitch was my main hobby.  It has a lot of detail work and was done on 18 count Aida cloth --- after I finished I "vowed" I'd never use that small of a count again!  It was worth it though, as you can hardly tell I even used Aida cloth - looks almost like linen (not quite - but almost).
This post linked to: Whipperberry Friday Flair
                             Fibers on Friday 
                             Made With Love Monday

Wednesday, February 23, 2011

Boys Birthday Cards

I got the idea for these cards from the Christmas 2010 Paper Craft Inspirations magazine (my dh got it for me as a gift last year - he knows what I like!).  Since masculine (and boys) cards are a challenge for me, I was so happy to see several really neat ideas in this issue.  Linking to the free template for these cards so you can make some too! The one above is for a sweet nephew of mine that just turned 8 years old......I didn't personalize the second one as it's an "extra" that I'll send to ????? when the occasion arises!  (Like to make two of whatever I'm making so as to have one on hand for those times I need a card quick!)
Supplies used:
  • Misc. Cardstock and printed paper from my scrap bin
  • Wiggly eyes for the headlights
    This post linked to: Made With Love Monday

    Tuesday, February 22, 2011

    Giant Chocolate Chip Cookie

    Today is my husband's birthday -- he's not overly fond of cake, so my tradition has been to make him a giant chocolate chip cookie each year. Thought I'd share the recipe I use for Soft and Chewy Chocolate Chip Cookies as well as a few tips I've picked up along the way.
    Thick, Chewy Chocolate Chip Cookies
    1 cup butter (at room temp.)
    1 1/2 cups firmly packed brown sugar
    2 lg. eggs
    1 tsp. vanilla
    1 tsp. baking soda
    1/2 tsp. salt
    2 1/2 c. flour
    2 cups semisweet choc. chips
    1 c. chopped pecans (optional)
    1. In a med. bowl, beat butter and brown sugar until well blended. Beat in eggs and vanilla till smooth.
    2. Mix flour, baking soda, salt in another bowl.  Stir into butter mixture until well incorporated.  Stir in choc. chips and pecans
    3. Drop dough in 2 Tablespoon portions (1/8 cup) - 2 inches apart onto buttered baking sheets.
    4. Bake for 6 to 8 minutes in a 400 degree oven.
    5. Let stand a few minutes and then transfer cookies to wire rack to cool completely.
    I baked the big cookie about 12 minutes - and it definitely turned out soft and chewy! 

    Here are the tips for soft/chewy cookies I've gathered:
     High moisture content helps to make them soft/chewy ---adjusting the baking time, temperature, and recipe is the trick.

    Recipe Adjustment:
    Brown sugar (especially if it contains molasses which is 10 percent water)
    A little extra flour - makes the dough stiffer so it spreads less and there is less liquid evaporation
    Butter and eggs also work towards the moisture retention making the dough more elastic and add steam as the cookies bake
    Mass helps retain the moisture as well -- BIG dollops of dough instead of 1 teaspoon
    Baking Time
    Bake thick cookies for a shorter time to minimize spreading
    Remove cookies when the rim is brown and at least 1/3 of the center remains pale
    Temperature
    Increase oven temp. to bake quicker

    Try it and let me know what you think!
    This post linked to:
    Take A Look Tuesday
    Humble Homemaking Weekend Review 
    Fun With Food Friday 
    Sweets For A Saturday 
    Sweet Tooth Friday
    Culinary Smackdown Battle - Cookies


    Monday, February 21, 2011

    Art Bag

    I have been wanting to make my daughter an "art bag" for some time now.  She loves to write and draw, and I wanted something she could grab easily and carry along with her wherever she goes.  I hadn't taken the time to sit down and think it all through yet when I found this post (check out this extra cute Journal/Doodle Case).
    Since I didn't really need the journal part of this (I've already made her a journal jar and matching journal) I went for something a little smaller.  Here's a view of the inside of mine:
    As the case was smaller than the "Creative Princess'" the pencils wouldn't fit horizontally --- no problem -- I just turned the pockets the other way so as to house the writing utensils vertically.
    In the left side I placed a Word Search book (my daughter loves doing these) and on the right side is a tablet of paper for writing/drawing.
    The good thing is - this only took about 1 hour to whip up -- that includes measuring/cutting/quilting the front/sewing together- not bad! It was an instant hit - and I see it getting lots of use in the future from my doodling daughter!
    You'll want to check out this adorable mini coloring tote as well ---
    This post linked to : Made With Love Monday 
                                   Handmade Tuesdays
                                   Take A Look Tuesday
                                  Crafty Friday - from Inspired and Unscripted

    Saturday, February 19, 2011

    Peanut Butter Iced Brownies

    Some good friends of ours have had a rather "rotten" start to this new year, and I wanted to let them know I care and hopefully cheer them up a bit.  I decided to make brownies and top them with some peanut butter icing.  (I mean how can you go wrong with a chocolate peanut butter combination?) After the brownies were baked I cut them out with a heart cookie cutter and piped the peanut butter icing on them.  Here's the recipe for this soft and creamy icing....
    Creamy Peanut Butter Icing
    1/2 cup butter, softened
    1 cup creamy peanut butter
    3 tablespoons milk, or as needed
    2 cups confectioners' sugar
    Place the butter and peanut butter into a medium bowl, and beat with an electric mixer. Gradually mix in the sugar, incorporate milk one tablespoon at a time until all of the sugar is mixed in and the frosting is thick and spreadable.  Frost your brownies/cake or whatever else you feel like trying this on! 
    Pipe the frosting on with a star tip if you are feeling fancy!
    This post linked to Sweets For A Saturday #5
                                 Fun With Food Friday

    Friday, February 18, 2011

    Easy Bake Oven Ideas

    My daughter received an Easy Bake Oven for Christmas this past year which set me to looking for recipes to use in it (instead of purchasing Easy Bake mixes - which can rack up money and usually don't taste nearly as good as "real food").  Thought I'd post my findings on here in case someone else could benefit from it.
    For the above cakes we actually used a Martha White Chocolate Chip muffin mix and store bought icing
    Here are some recipes using regular 
    cake/cookie/muffin mixes

    Martha White Mixes
    Preheat oven 15 minutes
     3 Tablespoons mix
    1 Tablespoon milk (or water)
    Grease pan and bake 12 minutes
    Cook in cooling chamber 8 - 10 minutes

    Brownies OR Cake
      Preheat oven 15 minutes
    1/4 cup regular brownie or cake mix
    1 T. plus 1 tsp. water (or milk)
     Grease pan
    Bake 12 minutes
    Cool in cooling chamber 8 - 10 minutes

    Cookies
    Preheat oven 15 minutes
    2 T. regular cookie mix
    1 tsp. water
    Grease pan
    Drop two small spoonfuls in pan
    Bake 12 minutes
    Cool in cooing chamber 8 - 10 minutes

    For the industrious:
    Here's a link to completely homemade recipes to use.
     We also did one up using peanut butter icing ---
    liked this one the best!
    Stay tuned for the p.butter icing recipe tomorrow.
    This post linked to: Whipperberry Friday Flair 
    Made With Love Monday

    Thursday, February 17, 2011

    Rolled Roses

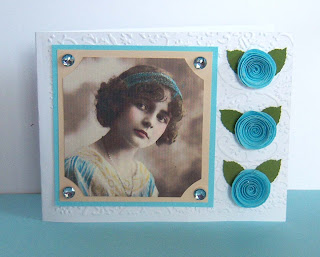
    I made up some rolled roses the other night to use on a project, but it didn't turn out like I'd anticipated....so I used them on cards instead. A very simple card to make ---
    Supplies:
    • Vintage image from Magic Moonlight Studio Free Images
    • White, blue, cream, green cardstock
    • Martha Stewart leaf punch
    • Blue Rhinestones
    • Corner rounding scissors 
    • Textile Embossing folder (Provo Craft)
    I used a scrapbooking program to print up some Scripture clip art  a long time ago so this card was easy too --- just pulled the image from my stash and added the embellishments!
     Supplies:
    • White/blue/black/green cardstock
    • Martha Stewart leaf punch
    • Textile embossing folder (Provo Craft)
    This post linked to: Whipperberry Friday Flair 
                                  Made With Love Monday

      Wednesday, February 16, 2011

      Simple Things


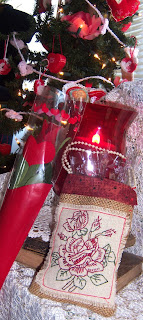
      I've been bitten by the "embroidery bug" of late --- can you tell?  I wanted to make something special for my daughter to give to her SS teacher for Valentines Day.  When I saw this rose image I knew immediately I wanted to make something with it.  The little burlap gift bag on the right is what I came up with. I copied the rose picture onto my muslin fabric using a light box and used red/green/brown embroidery thread to stitch over it.


      I sewed a piece of fabric to the top of the burlap - folded it down over the top and hot glued some pearls to the sides for a handle. 
      Of course it needed something yummy inside so I filled it with Lindor truffles and accompanied it with the red rose on the left.

      Here's another little gift I recently made up --- cut out a flower and stitched around it with variegated fibers... makes a cute little tag to add to gift.

      Side Note: You would figure that I wouldn't be able to remember where I printed this free rose image from --- if I find it I'll come back and link it up.  If perhaps you know - leave me a comment.

      Thought I'd leave you with a few embroidery links:
      1. Needle and Thread - free patterns
      2. Craft Gossip - more free patterns - lots of vintage patterns too
      3. Pattern Bee - free vintage patterns including redwork
      4. Craft and Fabric links -- this site has a wonderful list of stitches with directions for making them
      There's enough there to keep us all busy for quite some time!

      This post linked to: Whipperberry Friday Flair 
                                    Made With Love Monday
                                    Handmade Tuesdays

        Tuesday, February 15, 2011

        Sketch Challenge

        Another monthly challenge between my friend and I......this time it's a sketch challenge.   I picked the sketch for this month --- from Splitcoast Stampers -- click here to view
        Since Valentines Day is this month - I went with a pink/brown chocolate themed card. 
        Supplies used:
        • Punches

          • Martha Stewart heart border punch
          • Martha Stewart corner punch
          • Heart punch
        • Brown - pink polka-dot ribbon
        • Chocolate rub-ons
        Now go here to see what my friend made using that same sketch

        Monday, February 14, 2011

        Embroidered Purses

        Happy Valentines Day Everyone!  Today's project doesn't necessarily have anything to do with love......unless you count that I love making things, I love trying new things, embroidery fits both of those categories, and I'm lovin' experimenting with it!
        Since I made the valentine heart ornaments (in this post) - I've been wanting to doing something else --- but what?   I didn't want anything too big (so as to get discouraged with it) and nothing to complicated.  I decided to try making an embroidered  pocket from an old pair of jeans......here's my first creation:
        I traced around a teacup pattern from my paper piecing stash and then free-handed the rest.  I recently cleaned out our storage area and found three (small) pieces of fabric in the same design -- just different colors (pink, green, yellow).  I used those three on this -- the back is shown above - it's done in yellow.  I thought this would make a cute little gift bag -- it's the perfect size to put a fun pad in and a box of crayons in that front (jean) pocket.

        For the second purse I decided on an owl pattern.  I found a coloring page on-line that I liked and used it for inspiration in drawing the second design.  As soon as my daughter saw me working on it, she wanted it.  Knowing that little purse would NEVER fit all the stuff she likes to carry around with her - I enlarged this purse and made it in the rag design.  Used the same fabrics as the first one -- just put the seams on the outside and clipped them.  We both LOVE how it turned out!
        Can you tell I was having fun with my photo-shop program????
        This post linked to:


        Friday, February 11, 2011

        Valentines Day Food!

         Our Valentines Party with friends was Friday.  Here's what I contributed in the "fun food" department!
        Surprise V-day Cupcakes
        For these cupcakes I took a little batter out and dyed it red with food coloring.  A decorators bag helped me squeeze a little into the center of each cupcake for a colorful "surprise" inside! I made my own icing -- the same recipe I use to decorate my daughter's birthday cakes.  It's easy to work with and sets up nice (tastes good too!). Here's the recipe in case your interested....
        Creamy White Frosting
        1 cup shortening
        1 1/2 teaspoons vanilla
        4 1/2  cups sifted powdered sugar
        3 to 4 T. milk
        Beat shortening, vanilla with electric mixer on medium speed for 30 seconds.  Gradually add 1/2 the powdered sugar, beating well.  Add 2 T. milk. Gradually beat in remaining powdered sugar and enough remaining milk to reach desired consistency. 
        I use my Pampered Chef Accent Decorator to swirl the icing on -- MUCH easier than a cake decorators bag. (Thank you Lois!!!)

         Chocolate Covered Marshmallows
        Melt chocolate - dip marshmallows - add sprinkles and Wa La - yummy treats created!  The small heart shaped ones are the strawberry flavored ones Wal-mart had out for V-day.

        Heart Shaped Jello Jigglers
        The fun things about all these treats is that they can be customized for any holiday or occasion.  Simply change the colors of icing/batter/sprinkles/jello and the shape of the cookie cutter and you have fun - customized party food!